
If you love a handmade Christmas (and a bit of festive fun), you’re going to adore this working crochet cracker pattern! These crackers don’t just look cute – they actually pull apart and go bang, thanks to a little secret inside. This Christmas crochet cracker pattern is perfect if you’re looking for Christmas crochet ideas that stand out from the crowd. It’s a quick, festive make that’s ideal for confident beginners, using simple stitches, a few scraps of yarn, and good old toilet rolls to give you that classic cracker shape. Ready to get cracking?
You’ll need:
- Red, white, black and gold DK yarn
- A 4mm hook
- Darning needle
- Scissors
- 3 toilet rolls
- Glue
- Cracker snaps
- Ribbon for tying
- Small treats or jokes to pop inside
Making the Crochet Cracker
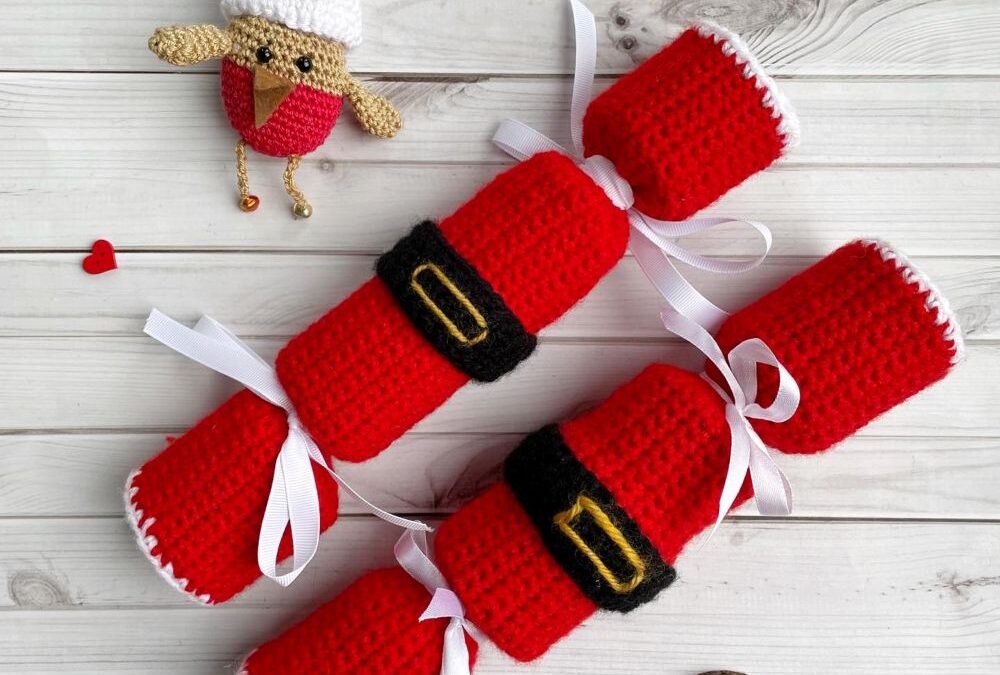
The red cracker body
With the red yarn, start with a slip knot and ch 30. Hold your chain around the middle of a toilet roll and stretch it out – it should be a little longer than the roll. Mine measured around 16cm.
Put 1 dc in the 2nd ch from the hook and continue with 1 dc in each stitch until the end of the chain.
*Ch 1, turn. 1 dc in each stitch to the end of the row.
Repeat from * to end 30 more times.
Hold your rectangle around the toilet roll to make sure it fits. If so, slip stitch (ss) the two long sides together. Cut and fasten off. Sew in your ends and turn your red tube inside out so the seam is on the inside.
Add the white trim
With white yarn, join onto one end of the red tube with a dc. Work 1 dc into each hole around the end (they’re not proper stitches, just spaces). When you get back to the start, join with a ss to the first dc. Cut, fasten off, and sew in the ends.
This is one half of your Christmas crochet cracker pattern – now make the other half in exactly the same way.
Make the belt
With black yarn, ch 28. Wrap the chain around the middle of the cracker to check the fit – it should cover the join between your two red halves.
Put 1 dc in the 2nd ch from hook and continue with 1 dc in each chain to the end.
*Ch 1, turn. 1 dc in each stitch to end.
Repeat from * to end 4 more times.
Slip stitch the short ends together to make a loop.
With gold yarn, stitch a small rectangle buckle in the centre of the belt to give your crochet cracker that classic Santa-suit look.
Crochet the hat
With red yarn, make a chain long enough to fit around your head – mine was 85 chains.
Put 1 dc in the 2nd ch from the hook and continue with 1 dc in each chain to the end.
Lay your row flat and mark one-third and two-thirds along with stitch markers.
Join the ends together with slip stitches (make sure it’s not twisted). Continue slip stitching up to the first stitch marker.
Now for the points:
*Ch 5. 1 dc in 2nd ch from hook, 1 htr in 3rd, 1 tr in 4th, and 1 dtr in 5th.
Skip 3 stitches on the row and join your point to the main band with a ss.
Repeat from * to end until you reach the second marker. Then ss to the end where you joined your band. Fasten off and sew in your ends.
These little hats make adorable handmade touches if you’re after fun Christmas crochet ideas for your table.
Assembling your crochet cracker
Cut one toilet roll in half. Glue a cracker snap inside each half, making sure there’s no gap in the middle. Pop your treat, hat and joke inside.
Slide your two red crochet tubes over the toilet roll halves so that they overlap in the centre. Wrap your black belt around the middle to hide the join.
Now cut another toilet roll in half and put one half inside each end of the cracker, leaving a 2cm gap between the middle and outer halves (this is where the ribbon will go). Glue the ends of the cracker snap to the inside of these halves.
Tie your ribbon into bows around the gaps; this gives your crochet cracker that classic shape and a lovely festive finish.
Now for the fun bit: hold the ends firmly and pull – your crochet cracker will really go BANG!
Fancy a printable version?
If you’d like a tidy PDF version of this Christmas Crochet Cracker Pattern with pictures (perfect for keeping, printing or gifting), click HERE to grab it.