
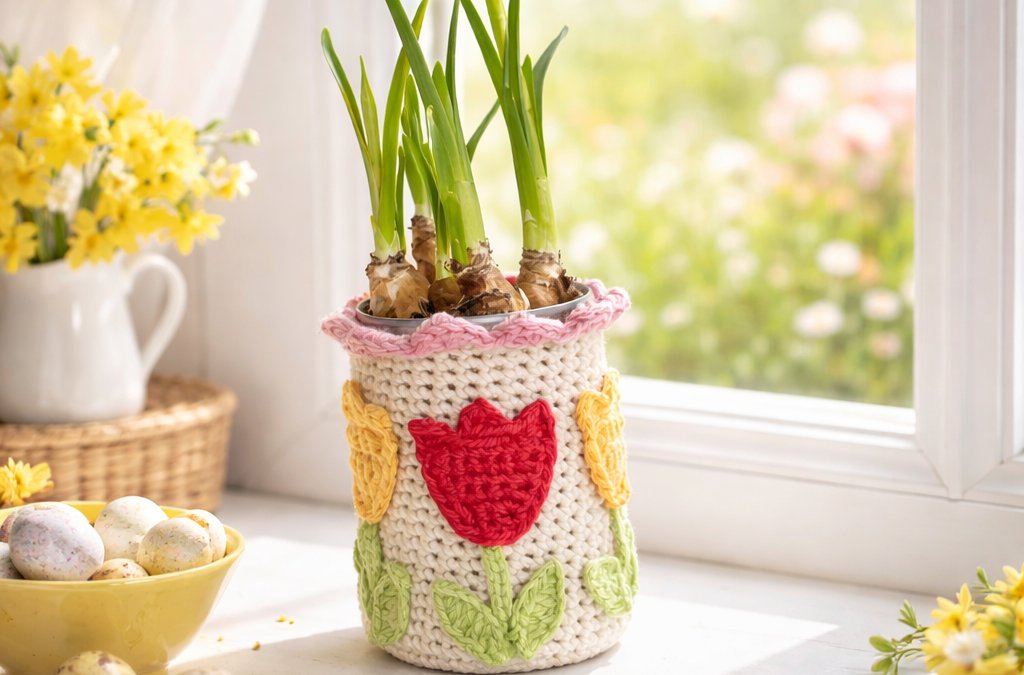
If you’ve got an empty tin can, a handful of yarn scraps, and ten minutes of “I fancy making something cute”… this is for you.
This crochet tulip cover is one of those brilliantly simple makes that looks far more impressive than the effort involved. It’s beginner-friendly, stash-busting, and perfect for popping spring bulbs inside to make a lovely handmade gift or decoration.
If you can do a dc and chain, you can absolutely manage this.
What you’ll need for the crochet tulips cover
- 4mm hook for the cover
- 3mm hook for the tulips, stems and leaves
- DK yarn scraps in:
- Neutral colour for the cover
- Tulip colours (I used King Cole Cottonsoft in Orange, Cherry, Coral, Gold/Yellow, Raspberry… anything cheerful!)
- Lime or green for stems and leaves
- Contrast colour for the scalloped top edging (I used Rose Petal)
- Empty tin can (standard soup size works well)
- Stitch marker
- Yarn needle
- Scissors
- Spring bulbs!
Crocheting around the tin can
With the 4mm hook, start with a slip knot and chain 6. In the furthest chain from hook, put a sl st to make a circle.
Ch 1 (pop a stitch marker into the ch 1) and do 10 dc into the circle. Into the stitch after where the stitch marker is, do a sl st to join.
Ch 1 (pop a stitch marker into the ch 1) and do 2 dc into each stitch. Into the stitch after where the stitch marker is, do a sl st to join.
Ch 1 (pop a stitch marker into the ch 1) and do 2 dc into each stitch. Into the stitch after where the stitch marker is, do a sl st to join. Ch 1 (pop a stitch marker into the ch 1) and do 1 dc into the first stitch and 2 dc into the next. Repeat *1 dc, 2 dc* all the way around. Into the stitch after where the stitch marker is, do a sl st to join.
Ch 1 (pop a stitch marker into the ch 1) and do 1 dc into the first stitch, 1 dc into the next and 2 dc into the next stitch. Repeat *1 dc, 1 dc, 2 dc* all the way around. Into the stitch after where the stitch marker is, do a sl st to join.
*Ch 1 (pop a stitch marker into the ch 1) and do 1 dc into each stitch. Into the stitch after where the stitch marker is, do a ss to join. You should find that at this point, the circle that you have made is ever so slightly smaller than the base of the tin can. If it’s not, you might need to do an extra round of 1 dc in every stitch.
*Ch 1 (pop a stitch marker into the ch 1) and do 1 dc into the BACK LOOP only of each stitch.
When you get back to the stitch marker, miss out the stitch where the stitch marker is (it’s not a proper stitch, it’s a ch 1) and put 1 dc into the next stitch (both loops). Leave the stitch marker where it is, there’s no need to take it out. Continue with 1 dc in each stitch until your cover is as tall as your tin can. You will be crocheting in the round which means there’s no end of the row – you just keep going round and round.
When your cover is tall enough, sl st four times to even out the top of your cover. I did this just before I reached the stitch marker (I kept my stitch marker in at the bottom).
Change to Rose-petal and put 5 htr into the next stitch. Sl st into the next stitch and sl st into the next.
Repeat: *5 htr, sl st, sl st* all the way around the top of your cover. Cut and fasten off. Sew in your loose ends.
Crocheting the tulips
Change to a 3mm hook.
For the Tulips, start with a slip knot and ch 4. Put 1 dc into the 2nd ch from hook and continue with 1 dc in each stitch until the end of the row.
*Ch 1, turn, put 2 dc into the first stitch, and 1 dc in each of the other stitches until the end of the row. Repeat from * until end until you have 7 stitches in total.
Ch 1, turn, put 1 dc in each stitch along the row.
Dc all the way around the edge of the tulip but do not put 2 dc’s in each corner stitch as we want our tulip to have curved edges rather than square corners.
When you get back to the top right hand side chain 3 (or top left hand side if you’re left handed). Put 1 dc in the 2nd ch from hook, and 1 htr into the 3rd chain from hook. Miss the first stitch on the top flat edge of the tulip and ss into the 2nd stitch (see blue needle).
Ch 3, and put 1 dc into the 2nd ch from hook, and put 1 htr into the 3rd ch. Skip 2 stitches on the top flat edge of the tulip and sl st into the next.
Ch 3, and put 1 dc into the 2nd ch from hook, and put 1 htr into the 3rd ch. Skip a stitch on the top flat edge of the tulip and sl st into the next stitch (which is slightly on the side of the tulip). Cut and fasten off, making sure you leave a long enough length to sew the tulip to the cover.
Repeat 4 more times so that you have 5 tulips in total.
For the stems, in Lime, start with a slip knot and ch 10. Sl st into the 2nd ch from hook and sl st all the way down the ch. Cut and fasten off, making sure you leave a long enough length to sew the stem to the cover.
Repeat 4 more times so that you have 5 stems in total.
For the leaves, in Lime, start with a slip knot and ch 8. Put 1 dc into the 2nd ch, 1 htr into the 3rd ch, 1 tr into the 4th ch, 1 dtr into the 5th ch, 1tr into the 6th ch, 1 htr into the 7th ch and 1 dc into the final ch. Cut and fasten off, making sure you leave a long enough length to sew the leaves to the cover.
Repeat 9 more times so that you have 10 leaves in total.
Arrange everything onto your cover, pin in place if needed, and sew all the individual pieces on.
Confession time – I glued mine on!
If you’d like a PDF version of this pattern, including helpful photos and videos showing the stitches used, you can grab it here: